Email Configuration Help Page
Electronic mail allows us to communicate today much faster than before. We can send words, pictures, files, and many other things through electronic mail (e-mail) across the country or even across the world in a matter of minutes.
Unfortunately, there have been many abuses of electronic mail. Most of us have had our share of SPAM (unsolicited electronic mail) offering us various products or opportunities that we did not ask for. Many of us have at least one friend whose computer was infected by a virus through electronic mail. As time goes by, we develop better methods of catching spam and virii before they hit your computer. It is a never-ending battle.
If you are reading this, you are getting Internet access from a "provider". This might be Cox, Southwestern Bell, NetZero, or any of a number of providers. You are not getting it from us. We are not in the business of running wires to anybody's house or office. These providers generally give you one or more e-mail account along the lines of "yourname@theprovidersname.com". When you are using their Internet access, you can use these e-mail accounts on their servers.
They used to let people connect directly to other e-mail servers as well. But in order to stop a lot of the spam traffic, many of the larger providers have stopped letting people connect directly to e-mail servers other than the provider's own. This is called "port 25 blocking", as e-mail communicates on a particular port (almost like a C.B. channel for those of you old enought to remember those). Instead of you being able to talk to anybody on port 25, you can only talk to your Internet provider on port 25, and only using one of the e-mail addresses they gave you. They most likely require you to use a username and password as well, though port 25 communication does not demand it; that was the problem.
There is a way around this, though. There is another well-defined port, port 587, that works kind of like the other one except it does require a username and password. Your Internet provider generally does not block this since it requires this authentication method to ensure you are not an anonymous spammer.
Below we will show you some examples of how to tell your e-mail program to check another e-mail account on top of the one it is checking already. This will let you not only receive mail sent to your address here but send it from here as well. There are many flavors of e-mail programs, but most are configured in roughly the same way.
Outlook Express
Adding another e-mail account under Outlook Express:
- Locate the menu bar across the top of the Outlook Express window.
-
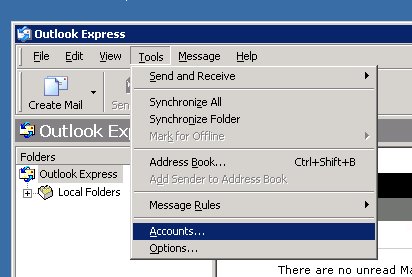 On the "Tools" menu, click "Accounts".
-
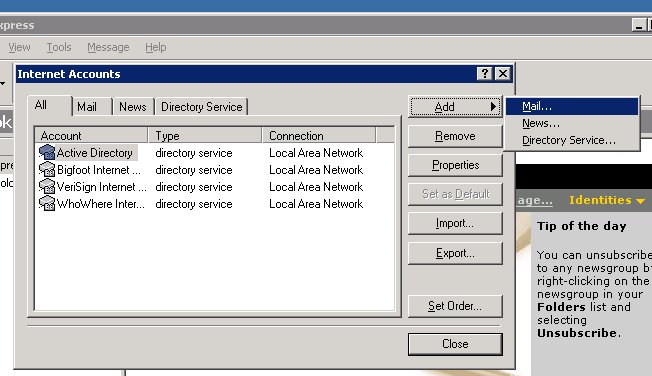 Click "Add", and then click "Mail". This opens a new window to walk you through the process.
-
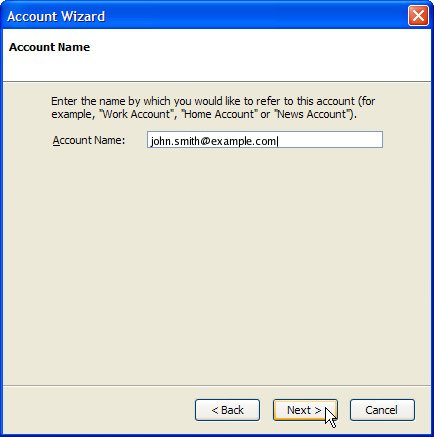
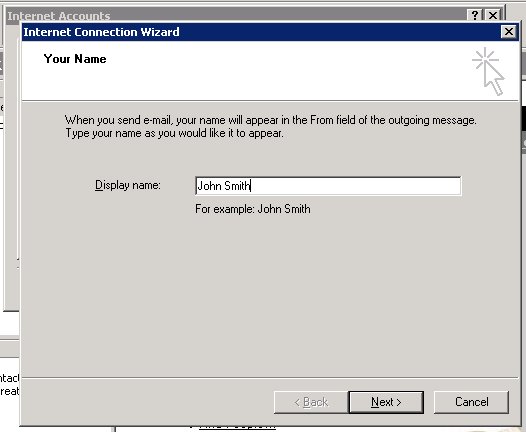 In the "Display name" box, enter your name or the name you want others to see when you send them a message, and then click "Next".
-
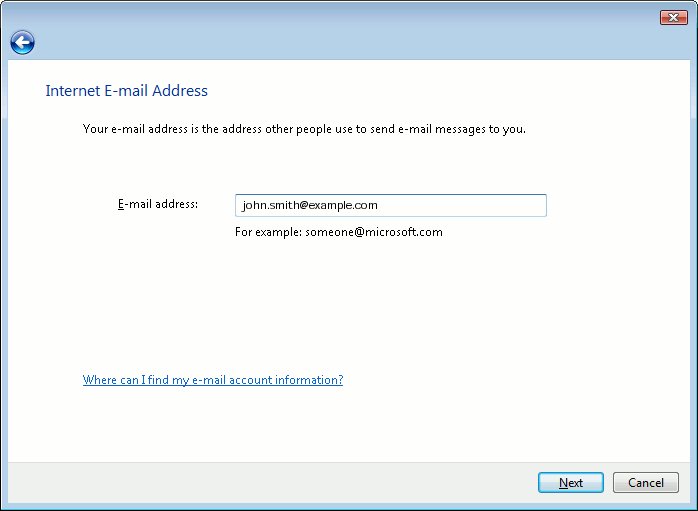
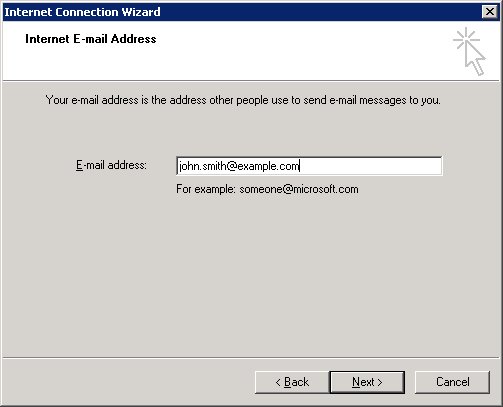 In the "E-mail address" box, type the full e-mail address for your account, and then click "Next".
-
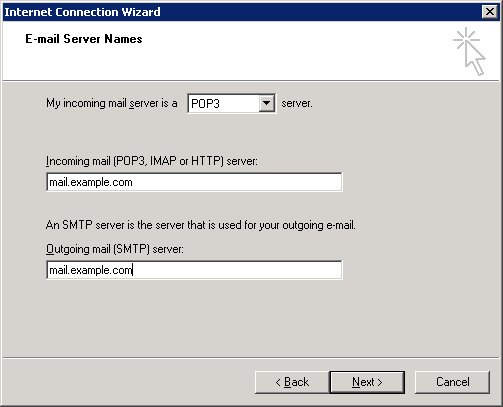 Under "E-mail Server Names", tell it your incoming server is a "POP3" server. Type the names of your incoming and outgoing e-mail servers (such as "mail.mydomain.com") in the appropriate boxes, then click "Next".
-
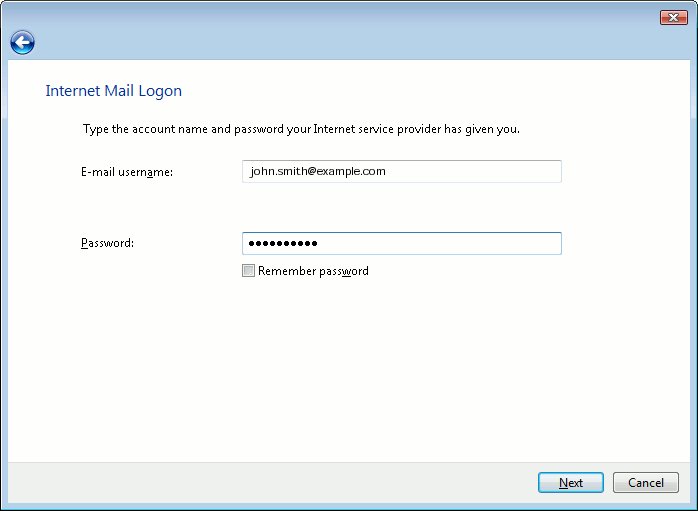
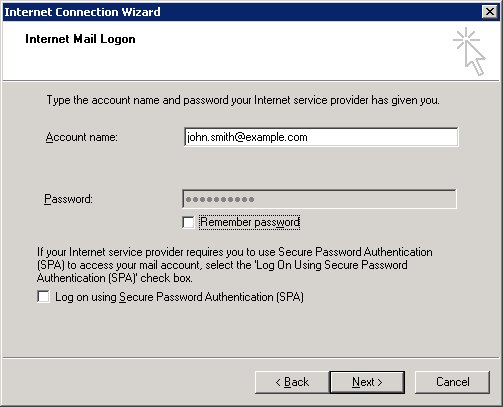 On the next screen, type your account name and password in the respective boxes. Your account name is your full e-mail address on our server, including the "@" sign and domain name.
- It may ask for the "Internet mail account name". If so, type a friendly name to identify the e-mail account you are configuring, and then click "Next".
- If prompted, select the connection type you use to connect to the Internet, and then click Next. If you are using a Dial-Up connection, select the dial-up connection you already use. This is the connection to the Internet itself through your provider.
- Click "Finish".
-
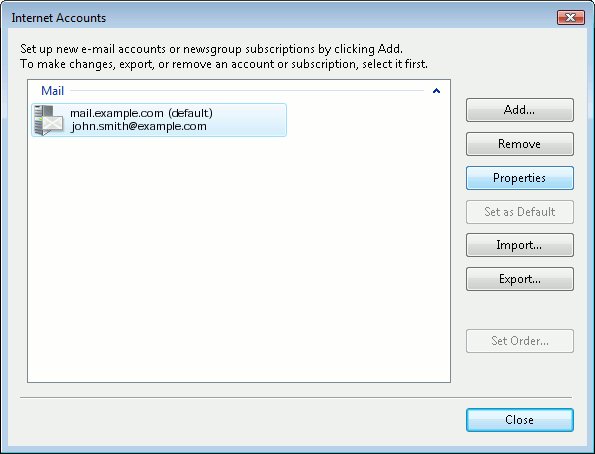
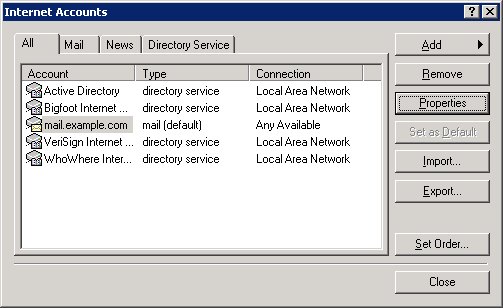 Now highlight the account you just added and click "Properties".
-
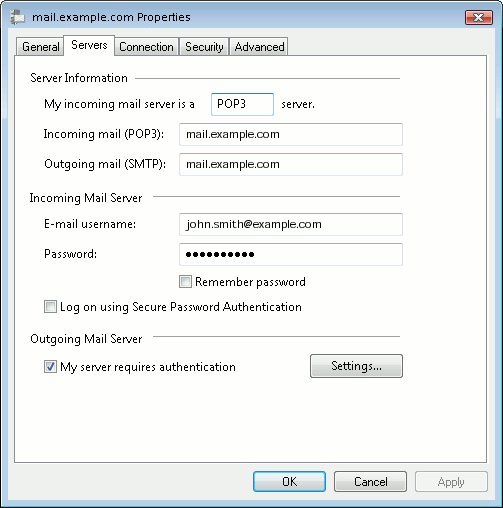
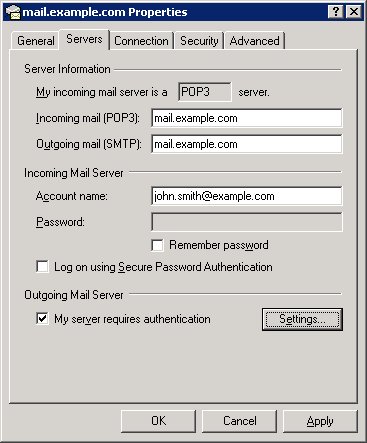 Click the "Servers" tab.
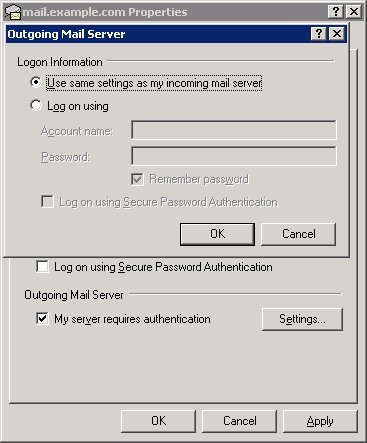
Under "Outgoing Mail Server", select "My server requires authentication". -
 Click the "Settings" tab.
Make sure that "Logon Information" is set to "Use the same settings as my incoming mail server".
Click "OK". -
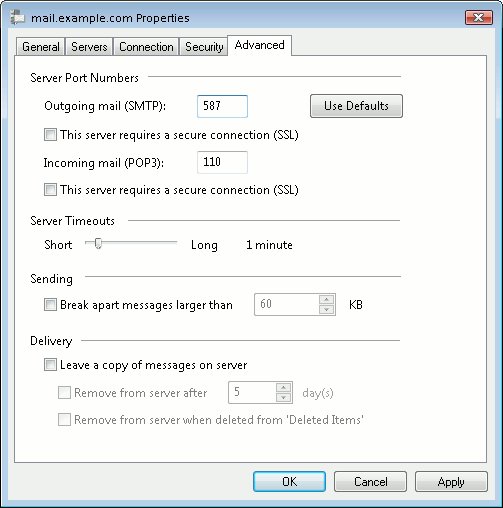
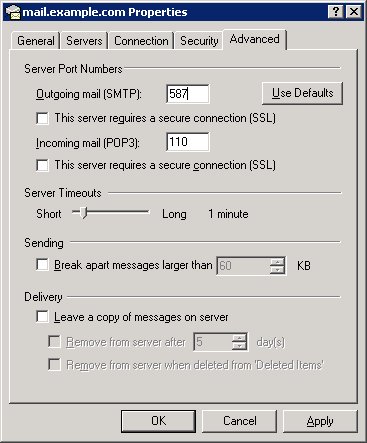 Click the "Advanced" tab.
Under "Outgoing Mail (SMTP)", change the port from 25 to 587. -
Click "OK".
Click "Close".
Outlook 2002/2003
Adding another e-mail account under Outlook 2002/2003:
- Locate the menu bar across the top of the Outlook window.
-
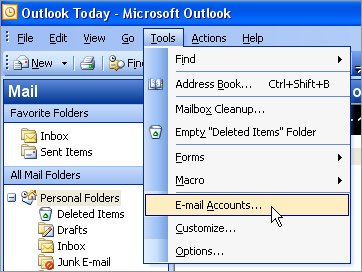 On the "Tools" menu, click "E-mail Accounts".
-
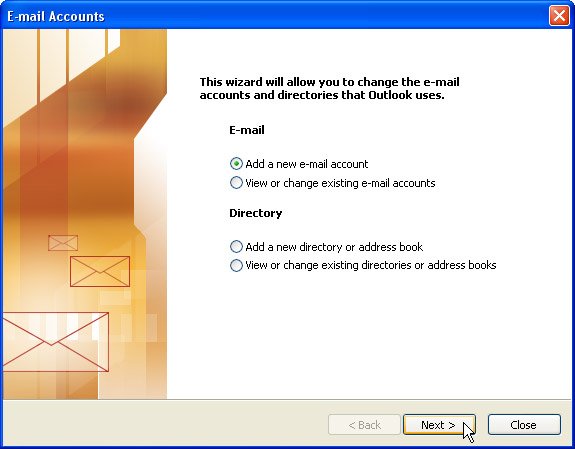 Click "Add a new e-mail account". Click "Next".
-
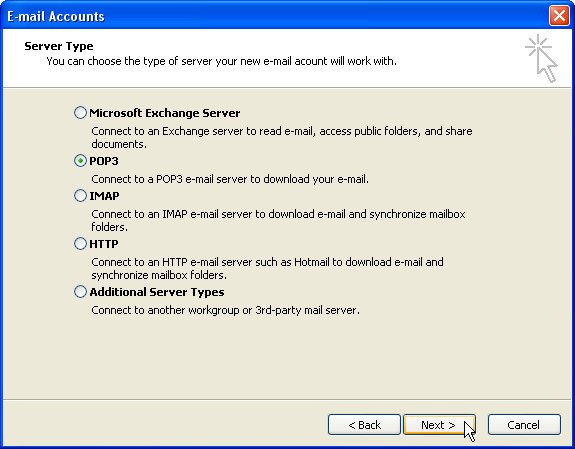 For "Server Type", select "POP3". Click "Next".
-
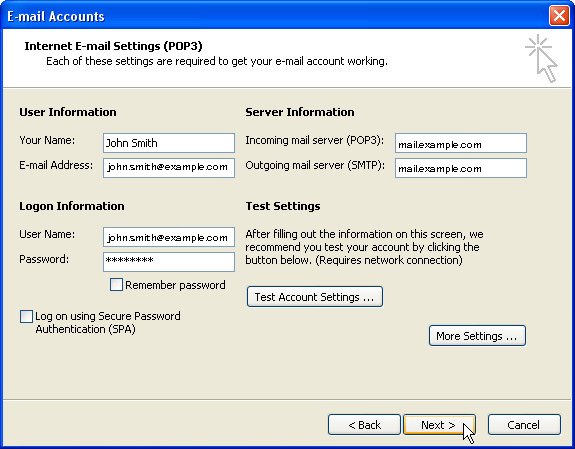 In the next window, for "Your Name" enter your name or the name you want others to see when you send them a message.
- In the "E-mail address" box, type the full e-mail address for your account.
- For "Server Information", type the names of your incoming and outgoing e-mail servers (such as "mail.mydomain.com") in the appropriate boxes.
- For "Logon Information", type your user name and password in the respective boxes. Your user name is your full e-mail address on our server, including the "@" sign and domain name.
- Click "More Settings". A new window will appear.
-
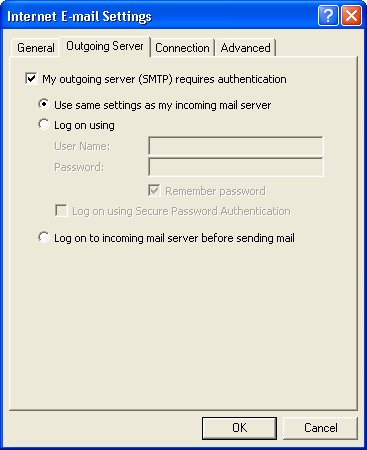 Click the "Outgoing Server" tab.
Make sure that "My outgoing server (SMTP) requires authentication" is checked and that "Use the same settings as my incoming mail server" is selected. -
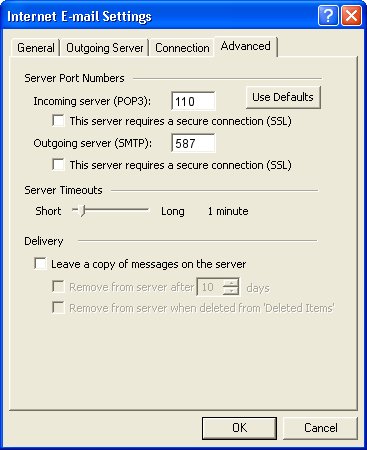 Click the "Advanced" tab.
Under "Outgoing Server (SMTP)", change the port from 25 to 587. - Click "OK".
- Click "Finish".
Vista (Windows Mail)
Adding another e-mail account under Windows Mail:
- Locate the menu bar across the top of the Windows Mail window.
-
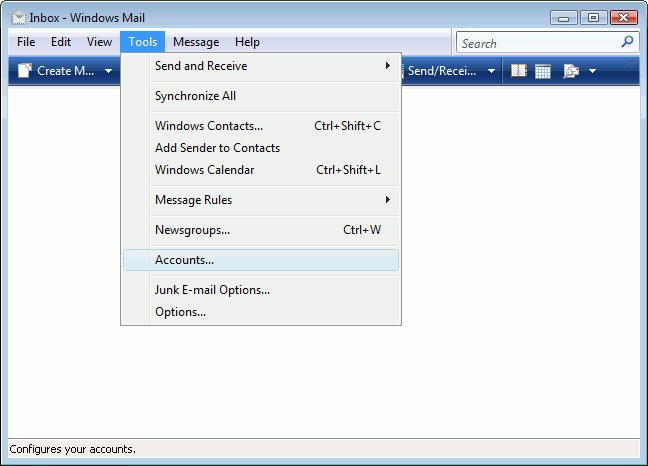 On the "Tools" menu, click "Accounts".
-
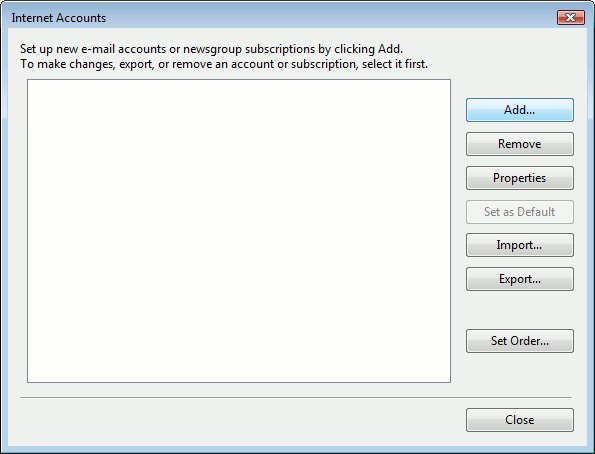 Click "Add".
-
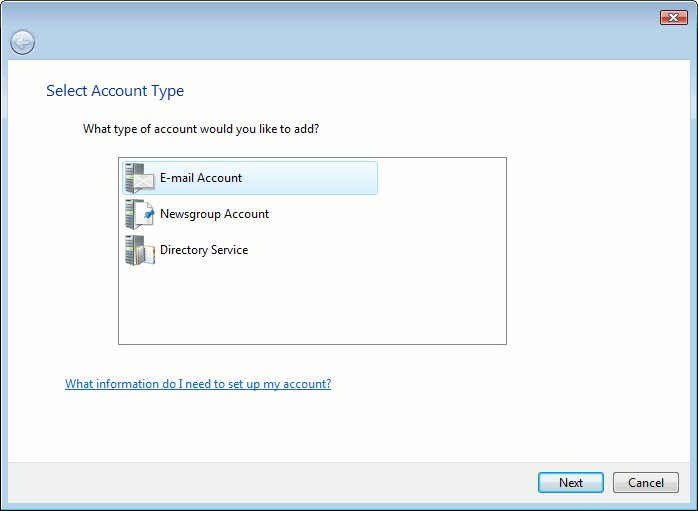 Click "E-mail account". Click "Next".
-
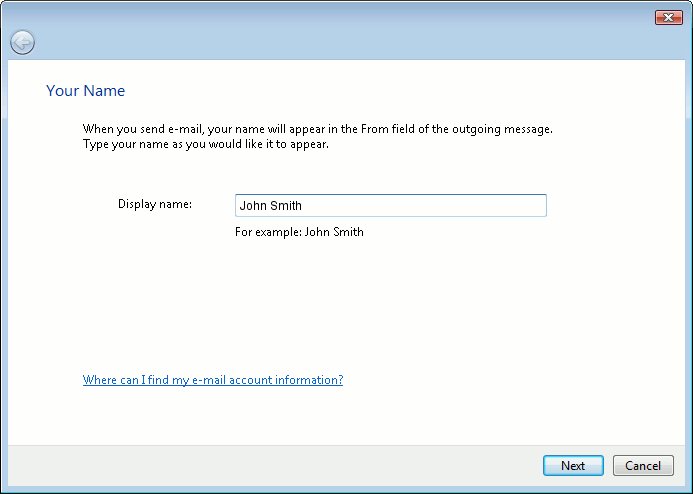 In the "Display name" box, enter your name or the name you want others to see when you send them a message, then click "Next".
-
 In the "E-mail address" box, type the full e-mail address for your account, then click "Next".
-
 Under "Setup E-mail Servers", tell it your incoming server is a "POP3" server. Type the names of your incoming and outgoing e-mail servers (such as "mail.mydomain.com") in the appropriate boxes. Check "Outgoing server requires authentication". Click "Next".
-
 On the next screen, type your account name and password in the respective boxes. Your account name is your full e-mail address on our server, including the "@" sign and domain name. Click "Next".
- Click "Finish".
-
 This brings us back to the "Internet Accounts" window. Highlight your new e-mail account and click "Properties".
-
 Click the "Servers" tab.
Make sure that "My server requires authentication" is checked. -
 Click the "Advanced" tab.
Under "Outgoing Server (SMTP)", change the port from 25 to 587. - Click "OK".
- Click "Close".
Macintosh OS X Mail.app
Adding another e-mail account under Mac OSX:
- Locate the menu bar across the top of the mail window.
-
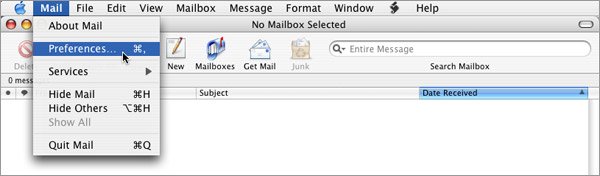 On the "Mail" menu, click "Preferences".
-
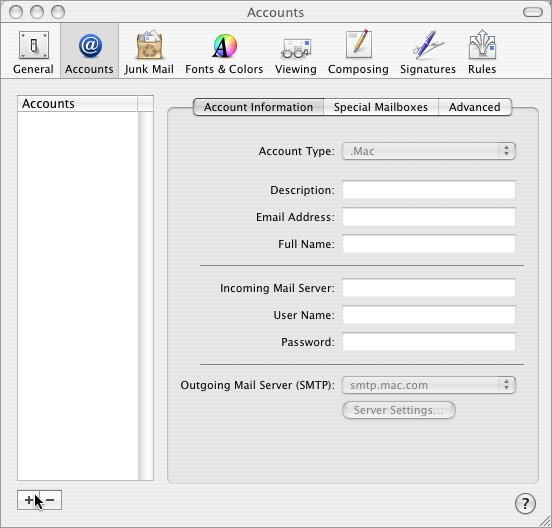 Click "Accounts".
- Click the "+" plus sign in the lower left corner.
-
 For "Account Type", select "POP3".
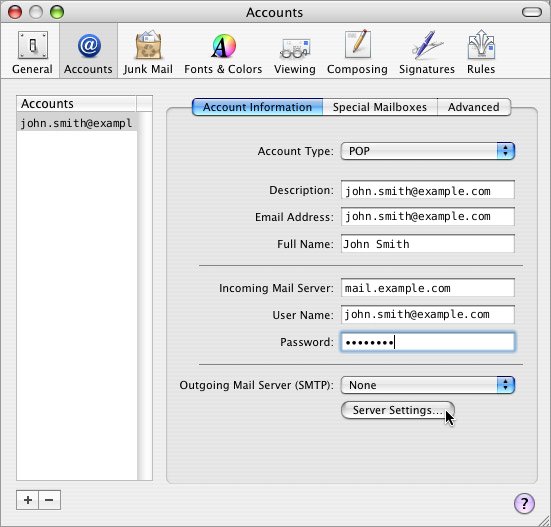
- In the "Description" box, enter your email address or some text that will help you identify this account from others on your machine.
- In the "Full Name" box, enter your name or the name you want others to see when you send them a message.
- In the "E-mail address" box, type the full e-mail address for your account.
- In the "Incoming Mail Server" box, enter the name of your incoming mail server (such as "mail.mydomain.com").
- For "User Name" and "Password", type your account name and password in the respective boxes. Your account name is your full e-mail address on our server, including the "@" sign and domain name.
- Click "Server Settings" to set up your outgoing server.
-
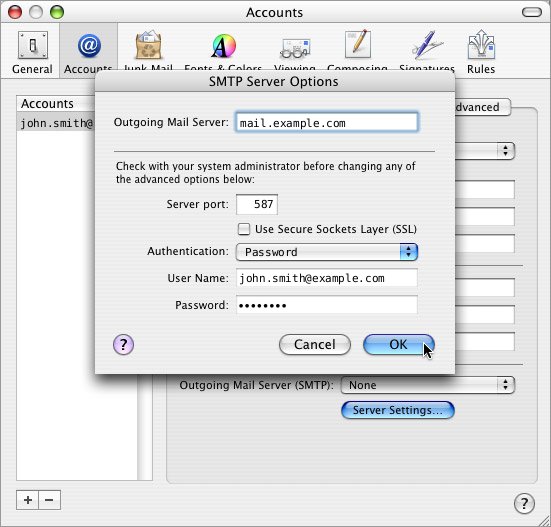 Under "Outgoing Mail Server", type the name of your outgoing e-mail server (such as "mail.mydomain.com").
- Click "Use Authentication". For "User Name" and "Password", again type your account name and password in the respective boxes. Your account name is your full e-mail address on our server, including the "@" sign and domain name.
- Leave blank the box by "Use Secure Sockets Layer". For "Authentication", select "Password".
- For "Server Port" change it from 25 to 587. (Where???)
- Click "OK".
- Close the Accounts window..
Mozilla Thunderbird and Netscape 7
Adding another e-mail account under Thunderbird or Netscape 7:
- Thunderbird: Locate the menu bar across the top of the mail window.
-
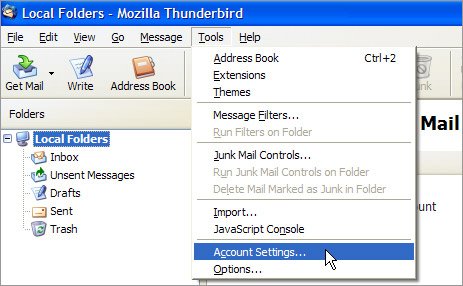 Thunderbird: On the "Tools" menu, click "Account Settings".
-
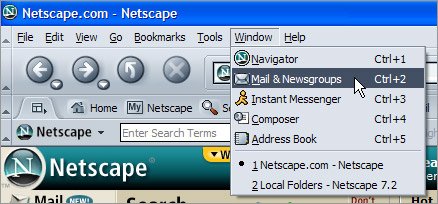 Netscape 7: Locate the menu bar across the top of the browser window.
Click on "Mail and Newsgroups". -
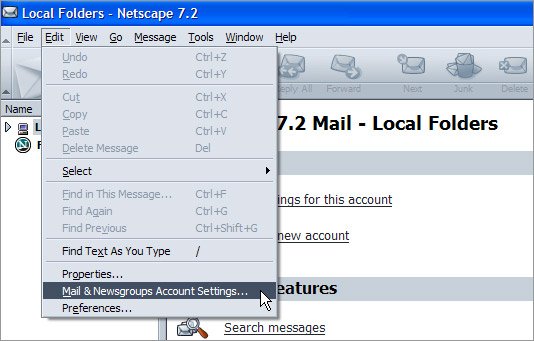 Netscape 7: On the "Edit" menu, click "Mail and Newsgroups Account Settings".
-
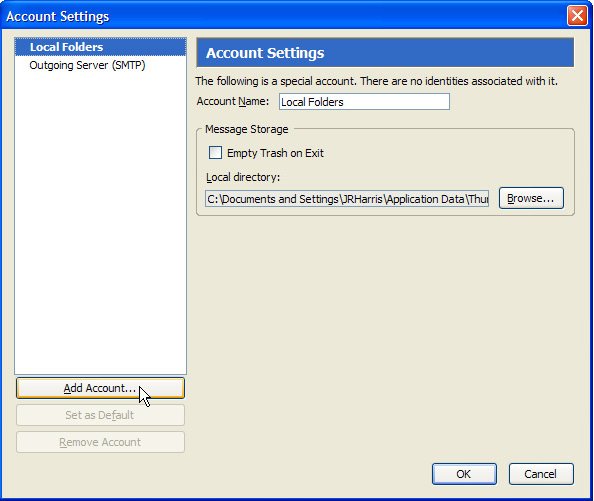 Click "Add Account".
-
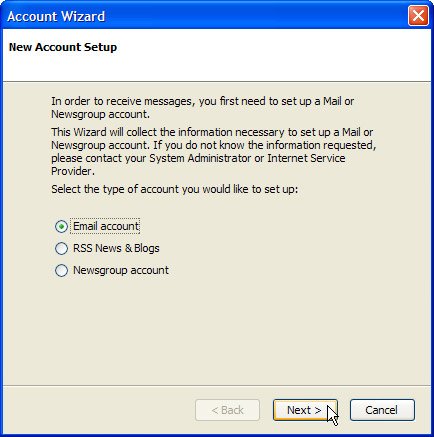 Select "Email account" and click "Next".
-
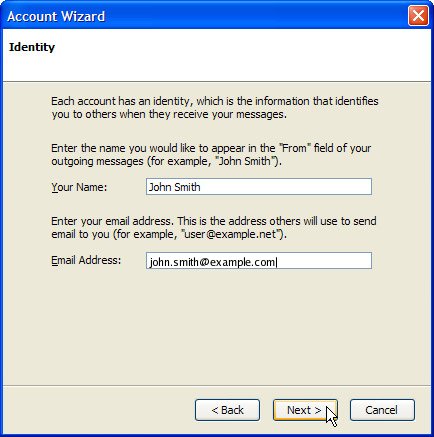 In the "Your Name" box, enter your name or the name you want others to see when you send them a message.
- In the "Email address" box, type the full e-mail address for your account including the "@" sign and domain name.
- Click "Next".
-
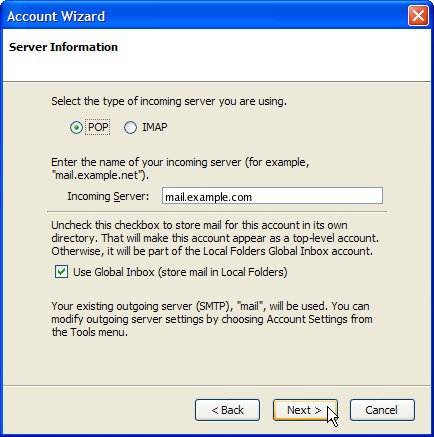 For the type of incoming server, select "POP".
- In the "Incoming Server" box, enter the name of your incoming mail server (such as "mail.mydomain.com").
- If you want your e-mail for this account to show up in its own folder, uncheck "Use Global Inbox".
- If an outgoing server has not already been configured, enter your outgoing mail server in the "Outgoing Server" box.
- Click "Next".
-
 For "Incoming User Name", type your user name in the box. Your user name is your full e-mail address on our server, including the "@" sign and domain name. Click "Next".
-
 In the "Account Name" box, enter your email address or some text that will help you identify this account from others on your machine. Click "Next".
- Click "Finish".
-
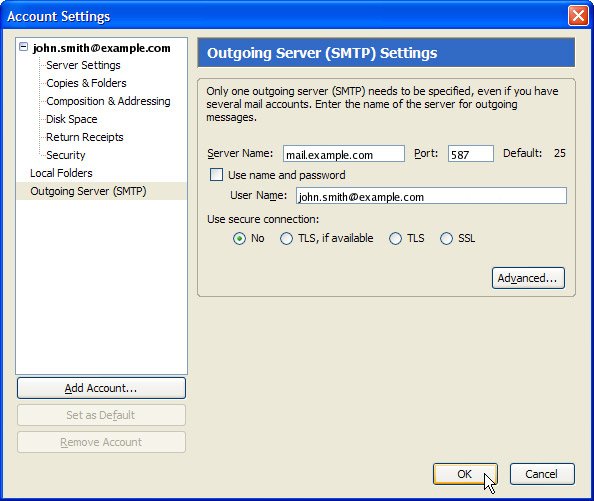 In the panel on the left side, click "Outgoing Server (SMTP)".
- Under "Server Name", type the name of your outgoing e-mail server (such as "mail.mydomain.com"). For "Port" change it from 25 to 587. There should already be a checkmark by "Use Name and Password". User Name and Password, again type your user name and password in the respective boxes. Your user name is your full e-mail address on our server, including the "@" sign and domain name.
- Click "OK".
- Close the "Account Settings" window.